The DFP has been around for a while now but I haven't got round to writing much about it.
I won't go through a fetishistic unboxing, since I don't have the final packaging for this unit.
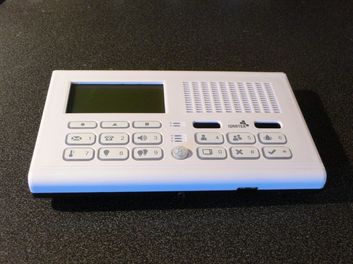

The DFP is constructed from a white plastic with a slight texturing. As well as curving round the case at the top and bottom there is a slight chamfer on the vertical edges. Visible on the bottom edge is an aperture for the temperature sensor, there are also two small push buttons.
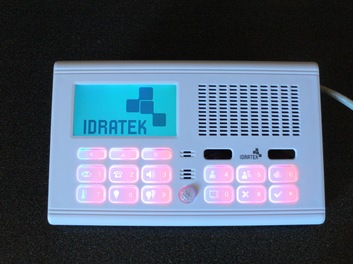
This view more clearly shows the front panel design, with apertures for the speaker and microphone, buttons, screen and windows for the IR functions. There are also moulded tramlines tip and bottom. I have to ask myself whether the DFP would have looked "cleaner" without them. Whilst still quite utilitarian, it is a great advance on the MFP aesthetics.
Despite looking a bit like rubber "jelly" buttons, the buttons are actually a hard translucent material and there is a nice definite action on them with acceptable travel and a decent click. This is improved over the MFP where the button travel was poor and it was very easy to "bounce" the buttons.
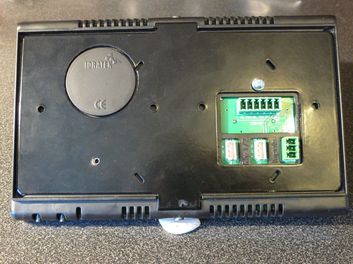
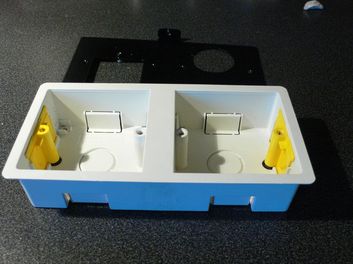
This shows the rear of the DFP. You can see the metal mounting plate that is intended to screw over your back box and the various connectors protruding through - Idranet connector, 2 relay module connectors (each module contains 2 C/O relays) and connector for the 2 digital inputs. So the unit offers an upgraded relay support over the old MFP.
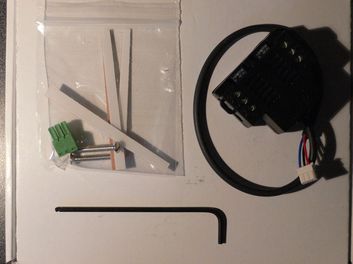
In the box you also get the connectors, screws, a nice hex key for the retaining screws that secure the DFP to the backplate, some mounting shims and wiring instructions. Also shown here is one of the relay modules - these are purchased as an optional extra.
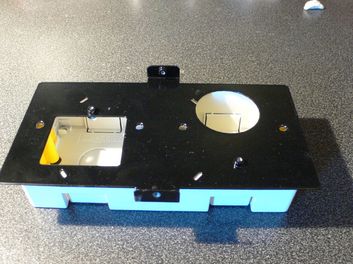
The DFP is intended to mount over a dual-gang box as shown above. The mains cabling and relays would be in the right hand side and the low voltage connections in the left, neatly segregating the wiring. You would need to route the relay module cable from one side to the other, most boxes have punchouts to allow this.
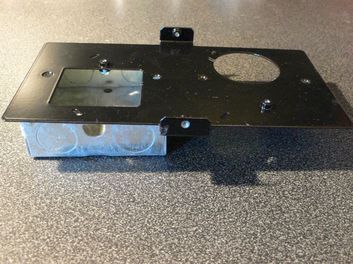
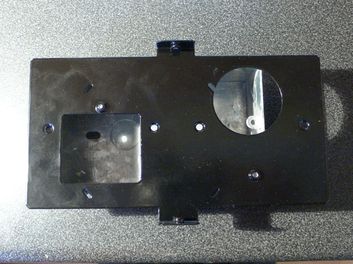
So here's how the backplate would offer up to the wall box. You can also see Eurobox punchouts on the backplate, but I don't have a Eurobox to show this. The mounting shims are provided to allow the DFP to mount securely over metal backboxes that do not have the protruding flange of drywall boxes.
The DFP can obviously be mounted onto a single gang wallbox as well, with some compromises over mains connections. The DFP will be offset in this case, which may limit it's placement in some situations, like retrofitting to wall switches adjacent to door frames. By my measurements you would need 103mm clearance from the right-hand mounting screw in the wall box to the rightmost edge of the DFP. In case you are wondering, it is not possible to offset the panel to the other side unless you mount it upside down!
One of my first thoughts was to wonder whether I could squeeze mains connections into the lefthand box as well. Since segregation would be required I have shown the relay module stacked with the normal Idratek segregation moulding against a 47mm wall box. You can see that they don't quite fit, and in any case it would be very tight to route solid copper mains cables round the relay module. Perhaps a bezel could be improvised to gain a little extra depth if this was unavoidable.
One of my particular concerns is how to mount the DFP onto a double box, so that I can replace my MFPs. Depending on the box depth there is space to fit at least one relay module in (remembering that segregation requires the insulating moulding to be used). However, you can see that the right hand box screw position falls under the speaker aperture on the wall plate. For this I am going to have to fashion some kind of mounting adaptor myself.
The DFP offers all the functionality of the MFP, audio, temperature and humidity, IR transmit and receive, PIR and light level as well as more buttons. These functions work in the same way as the MFP and other modules, so I'm not going to delve into them now.
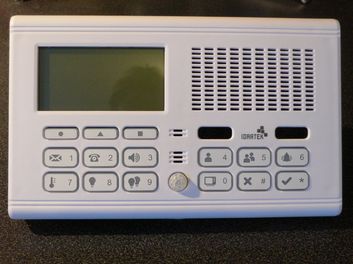
The major change is obviously the LCD display and also the newer buttons with backlighting and imprinted logos. Of course, this being Idratek, the button functions are completely assignable, the logos are present to allow typical functions to be assigned to buttons without having to remember which is which. The logos are clear and, I think, a good match for the functions you would access via the panel. Of course, in some applications other logos might have been preferred and removable button caps will be suggested, but at this price point I cannot argue with the decision to cover the majority case.
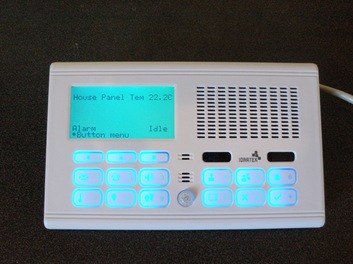
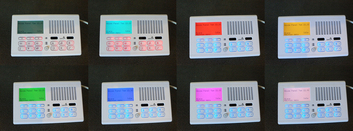
The buttons can be backlit in red or blue with controllable illumination level. Cortex provides a wealth of options to set different levels for different reasons, whether it's due to time of day or state of interaction with the panel. In the above picture the buttons are probably at full brightness, they can be set at a much lower level to give a quite subtle effect that is rather pleasing. I believe that the illumination level is set across all buttons, but the red or blue colour is controlled at an individual button level. This means that during interaction the panel can flag the active buttons by swapping the colour.
The LCD display has a controllable RGB backlight which can be set to a variety of colours and again Cortex allows this to be set according to all kinds of different situations. Already I am thinking this will be really nice for indicating alarm status.
Well, that's all for today, I'll get into controlling the display in another post.

Nice description of the DFP, espeically the RGB backlight line-up. Looking forward to the next article as I haven't really played with my DFP yet.
nice work David
can you point me to other blogs decribing the kit
cheers
Mark
You can find a list of Idratek blogs in the Idratek forum on www.automatedhome.co.uk:
http://www.automatedhome.co.uk/vbulletin/showthread.php?t=2288
on this blog it's more difficult to find specific entries relating to the kit, but the whole Idratek system is the subject of most of the home automation category, so just select that category and browse the archives!