I previously installed a fan in my loft in an attempt to control the temperatures reached due to solar heating.
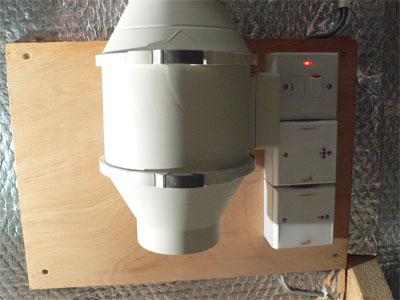
The fan is controlled using an Idratek DRH-001 module. This provides 2 SPCO (single-pole changeover) relays with a 13A rating. Since these are unfused, a separate fuse spur unit was included for protection. The fan motor has two windings, fast and slow. One of the DRH relays was used as an on/off and then fed across to the other to select one of the two windings. The DRH-001 is obviously suited to motor control, especially where connection reversal is required - this will be tested further at some future stage, when I automate a curtain.
The DRH-001 also has 2 low-voltage digital inputs, which were unused in this case.
Temperature sensing is performed using a DTS-001 sensor, this is slightly cheaper than the THS-001, which adds humidity sensing.
Having installed the modules (addresses were pre-configured), the DRH object in Cortex is configured. Like most objects in Cortex representing the various Idratek modules, a "connections" dialog is used to inform Cortex about ... err ... connected things.

Here I used a On/Off load type for each relay and gave it a meaningful name. You can choose a suitable icon for the new load in the plan view, I used the fan icon:
![]()
The DTS module was added to Cortex during pre-configuration, and doesn't have any connected objects, so here's the loft in plan view:
You can see the DTS represented by the thermometer, with current temperature alongside. Underneath that is the DRH module represented with the two fan related relays. These change colour when active. These are the smallest icons, other icon sizes with prettier icons can be used. The other icons seen here are the X10 gateway icon, which I moved to the loft in the plan, but is actually elsewhere in the tree structure. The final icon is the "loft cam", since Cortex now has video capture capability built-in.
Cortex is highly object-oriented, and there is also a tree view showing the object structure. Here's the loft in the tree pane:
The DRH-001 has no front panel buttons, but the two digital inputs are represented under the "Switches" object. The DRH also has two front panel LEDs which can be controlled.
The temperature sensor has a "behaviour" dialog, which initially shows current status and a plot of the data. This is fairly typical for sensor modules.
From here we can access another dialog which allows the setting of an arbitrary number of thresholds.
It might seem slightly weird that there are 5 thresholds, rather than 2 to define the operating regions of the fan. This is because each threshold crossing creates an event, which is then used to trigger an action. In this case, four of the actions are changing the relay states to select between off, slow and fast, but the fifth one (item 4 in the table) is used to generate a voice annunciation to any broadcast enabled panels.
To be honest, although the fan control works fine, the fan does not really shift enough air to counteract solar gain to the level desired for cooling my Node-0. Before next summer I will build a dedicated node 0 cabinet, which this fan will then vent, I already have the intake vent added to the roof. Obviously the temperature sensor will then have to be moved inside the cabinet.